
Whoa Nellie! It has been weeks since I have written. You see, we have been in the process of moving half way across the country. Every step of the way we have been very well cared for and blessed beyond measure. Even still, moving (as I am sure most everyone knows) is a chaotic adventure. I would liken moments of it to “walking up the stairs to your bedroom in the dark, and thinking there is one more stair than there is. Your foot falls down, through the air, and there is a sickly moment of dark surprise as you try and readjust the way you thought of things.” (Lemony Snicket, Horseradish)
We only brought with us what we absolutely needed, and are living in a lovely temporary situation with our friends who are transforming their home into an urban homestead. There are (crazy) chickens and rabbits that will be birthing on Friday while the kids and I are the only ones home! I have studied to be a Doula in the past, though, so surely I can assist a birthing rabbit…right? Right? (Gulp!). Say a prayer, will ya?
While we have been living very simply, which I am totally enjoying by the way, there have been things that we have all missed. The kids are definitely missing certain toys. And the great part about that is, when we finally do get all of our belongings from storage, everything will feel like new again! The kids and I were recently talking about some of their favorite toys, which got me thinking about this post. In some ways we have not really missed things because we have chickens and bunnies to play with as well as wonderful new lands to explore. But given that the youngest needs to be on a schedule, we are at home a decent amount of the time. And let’s be honest: I love toys too 🙂
In addition to loving toys, I have a deep need to be creative…to do creative things…to create! Annnnnddddd I have wayyyyy more hobbies than may be considered normal in some circles. But I am not among those who love to cook and bake. I love to paint and draw, I love photography and I love to build things. During college I found so little time to do these things that there was a part of me that was very sad. Once I graduated I threw myself into all things creative, which hit an all new level when I found myself planning our wedding and preparing for our first baby. After baby #1 was a few months old I had an itch to try something new in the creating and creativity realm. I wanted to make toys! I dig good ol’ wooden toys and I get a kick out of making toys from things that would otherwise be thrown away (and my kids tend to gravitate to ‘trash’ anyway – win/win!). Growing up, with the help of a wonderfully talented friend, I had a doll house made out of boxes, and I built much of the furniture myself from cardboard and punch out wooden kits that required staining and painting. I never actually spent much time playing with the dolls/house, but I spent hours building a constructing it. It was a true hobby!
I thought I would give a peek into some of the things that I have done for the kids – ones that they have thoroughly enjoyed! Some of these I have created from scratch on my own, and others I have found as DIYs on blogs and so on.
Bowling Set!
Do your kids eat ‘puffs’? Despite the fact that I didn’t keep them on hand constantly, we still went through plenty of containers of them over the course of months/years. Early on in our puff-consuming days, it dawned on me that the container looked like a bowling pin, so I started saving them! I finally acquired 10 containers, bought a package of multi-colored electric tape, and voila! Bowling! You could definitely fill the containers with sand, salt, or something of the like to make them a bit bottom-heavy, but we just kept them empty. My children have an uncanny ability to open anything. This isn’t the greatest photo, but it’s the only one I could find. It looks like the ‘pins’ are even lacking the colored tape. I put the tape around the thinnest part of the neck and color-coordinated each row of pins so that the kids could learn how to set the pins up properly according to color.

Wooden People/Characters!
I went through (am still going through?) a phase of being slightly obsessed with the little wooden people that you can get at craft stores. Why? Because they can become ANYTHING! It was $20 or more to buy just a few plastic characters from my kids favorite books/shows, but I could spend a couple bucks on wooden people and fulfill my creative itch by taking (enjoying!) time painting them. They are a huge hit still today. The many-angled collage photo was initially just for my own reference so I could recreate in the future, but it turns out it is the only photo I have of the figurines. So enjoy every side of them 🙂
We have Sesame characters (I have to admit that Snuffy was a huge challenge and looks very Picasso – ha!). These were a creation of my own :

I made princesses for my Goddaughter. These were inspired by Box O’ Princesses: (oh, and they also have Boyville, which I see in my near future!)

Wooden Peg Sorting/Matching People in Pots!
I failed to take a photo of these, and they are in storage with our belongings, but here is a link to them.
I found all I needed at the craft store in the unfinished wood section. The “pots”, I believe, were called candle stick holders. I made the white dots with a q-tip. A pencil eraser would also work well. I did put a clear coat on them after to help keep the pain from chipping. I had no issues with them fitting in the pots after all the painting with the exception of our orange one because it was a much thicker paint than my other colors…and I painted the inside of the pots, which is definitely not necessary. Woops 🙂
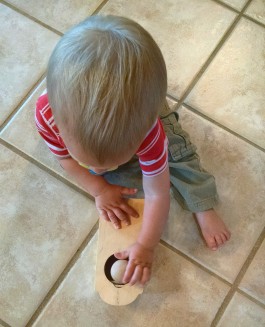
Object Permanence Box w/ Drawer!
When my oldest was very young, I saw one of these and thought it was such a simple and fun idea. A few months later, I purchased some clearance wooden instruments and they came in small wooden boxes without lids. I took apart the boxes and reconstructed them with wood glue to fit the vision. Then I purchased a bare wood door hanger from the craft store and cut it to size. I also purchased a package of unfinished wooden balls. For a finishing touch I bought a clearance drawer pull. Below are the pictures of the finished product. It was a huge hit! And continues to be!


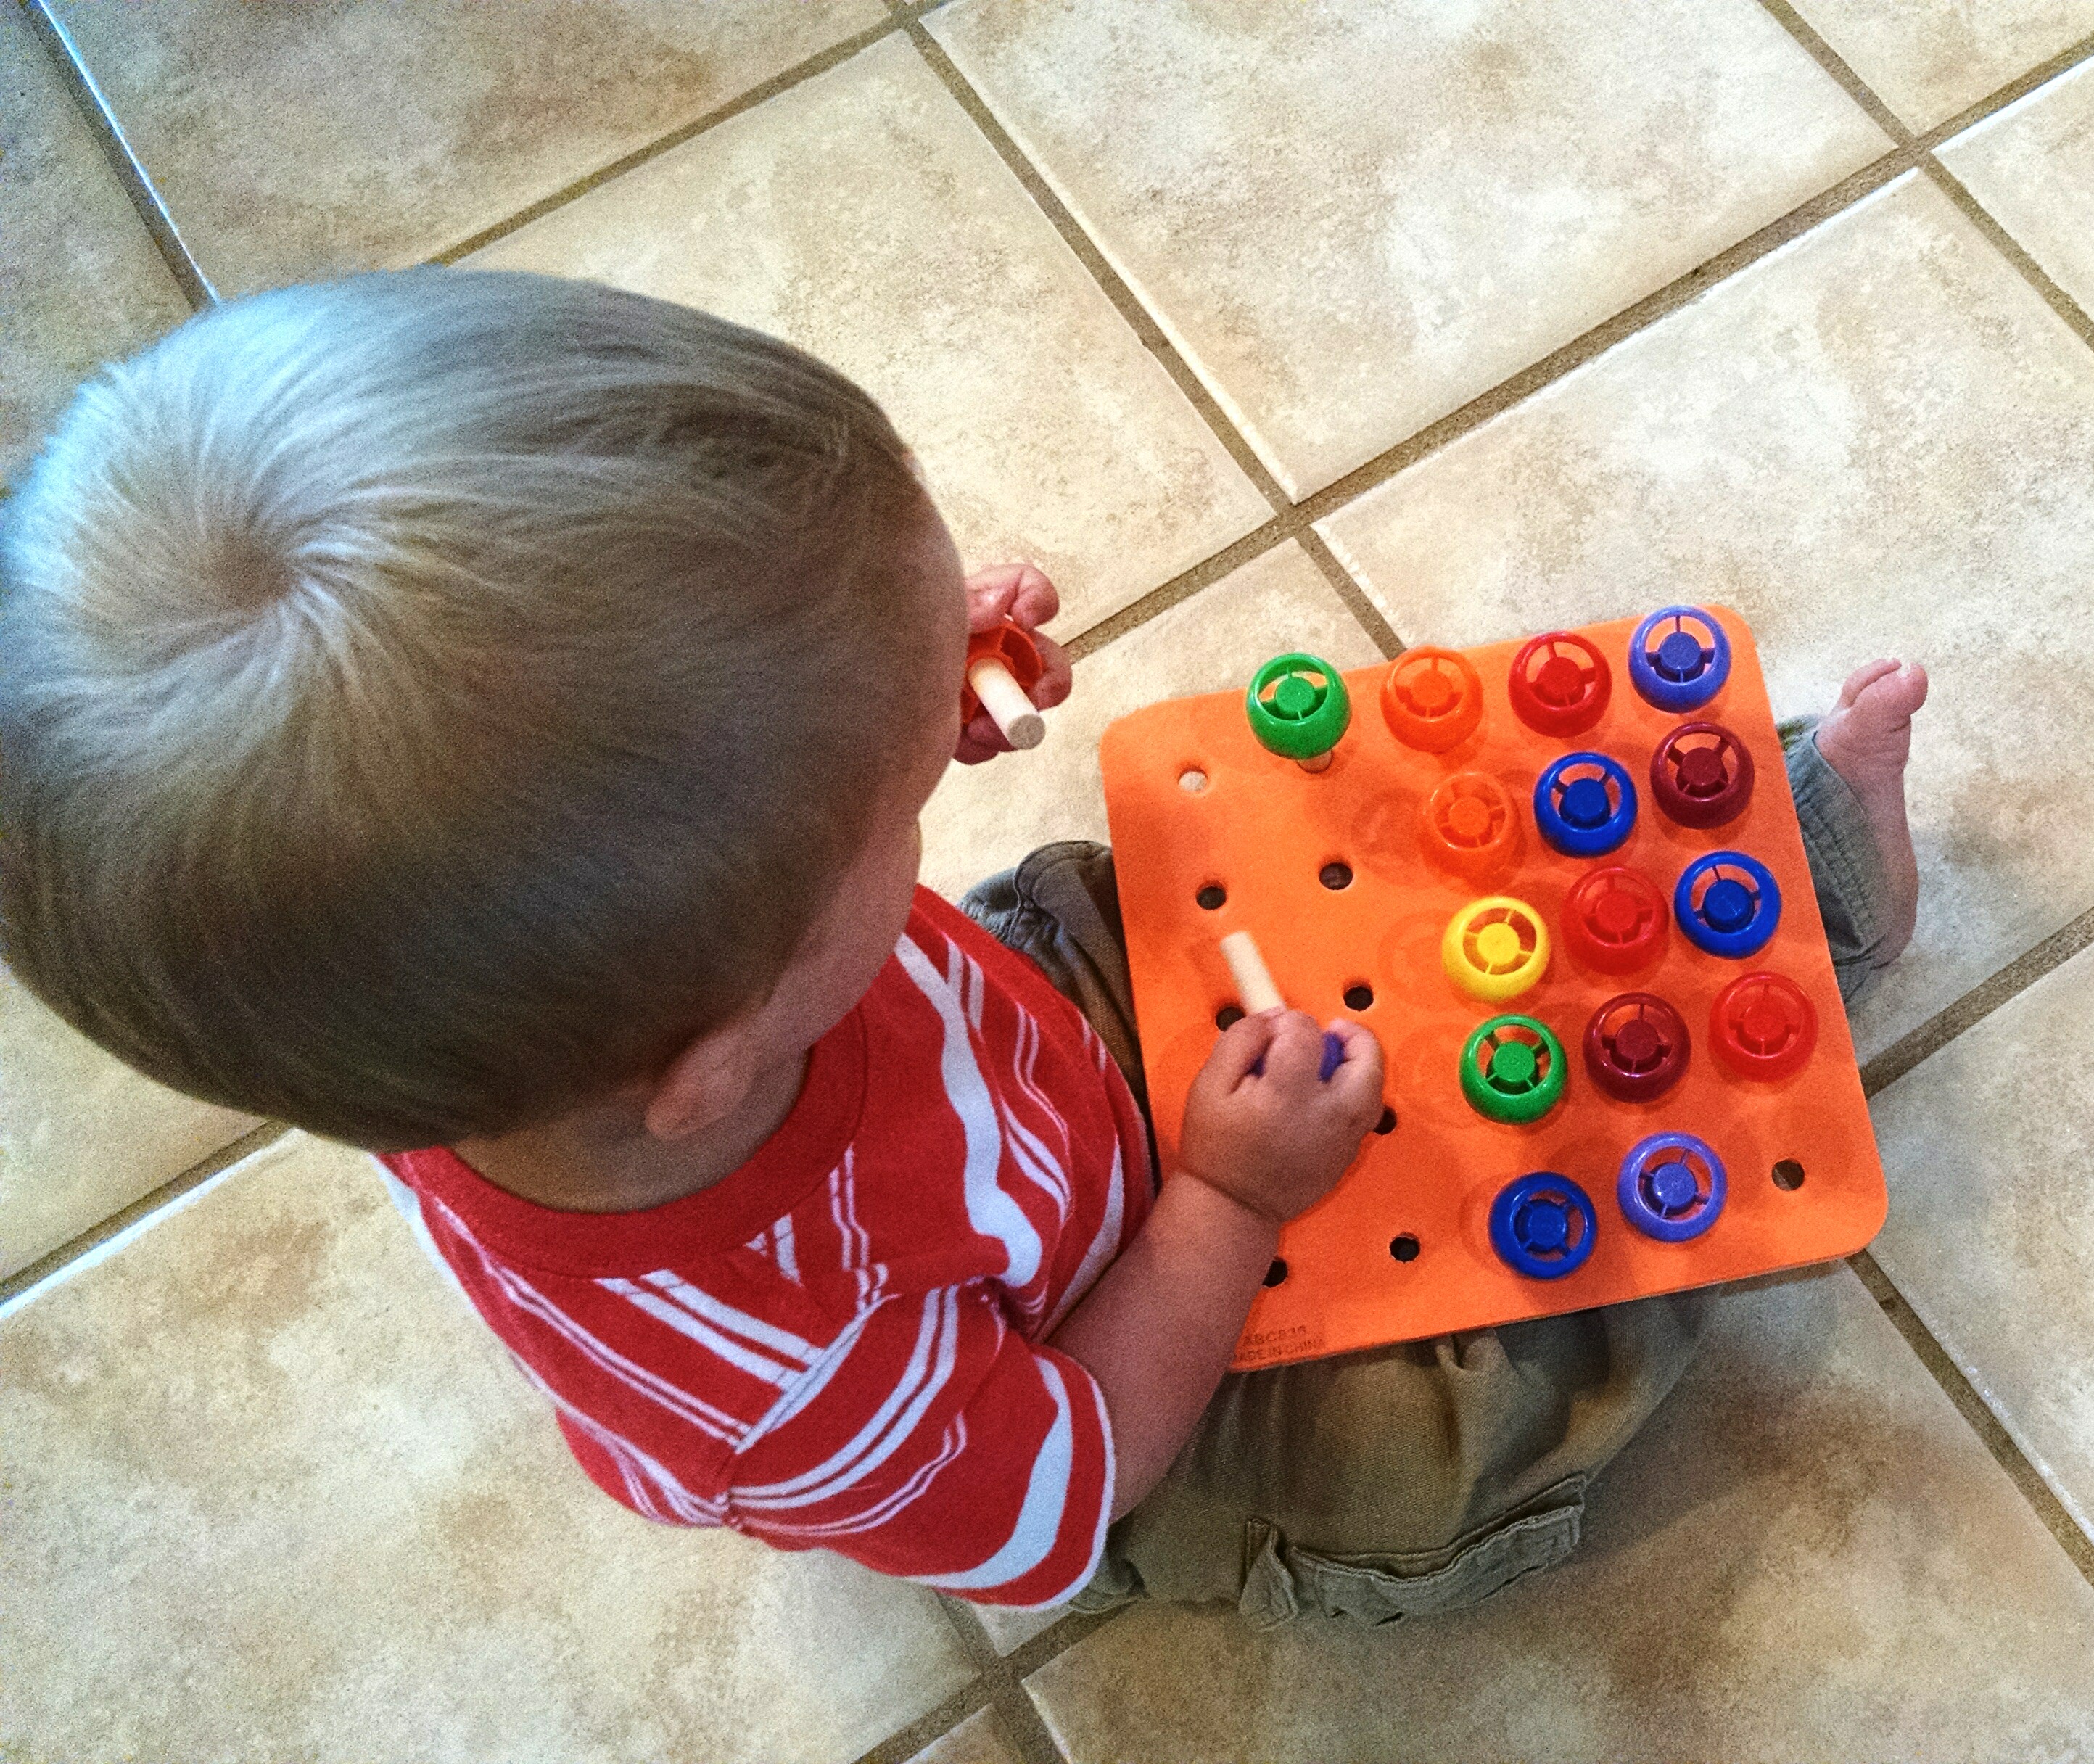
Colorful Pegs and Pegboard!
Back to baby food packaging….how about those pouches? I noticed pretty quickly that the kids liked the colorful tops, and I was pretty sure I could find a dowel rod to fit right inside, thus creating a peg. I used a small saw, cut the dowel to size, sanded the ends, and wood glued each one together. It took me a few months to find a peg board, but I came across one for just a couple of bucks at Lakeshore Learning (I could live at that store….). We have yet to complete our peg collection, but here is what we have so far!

Wooden Blocks!
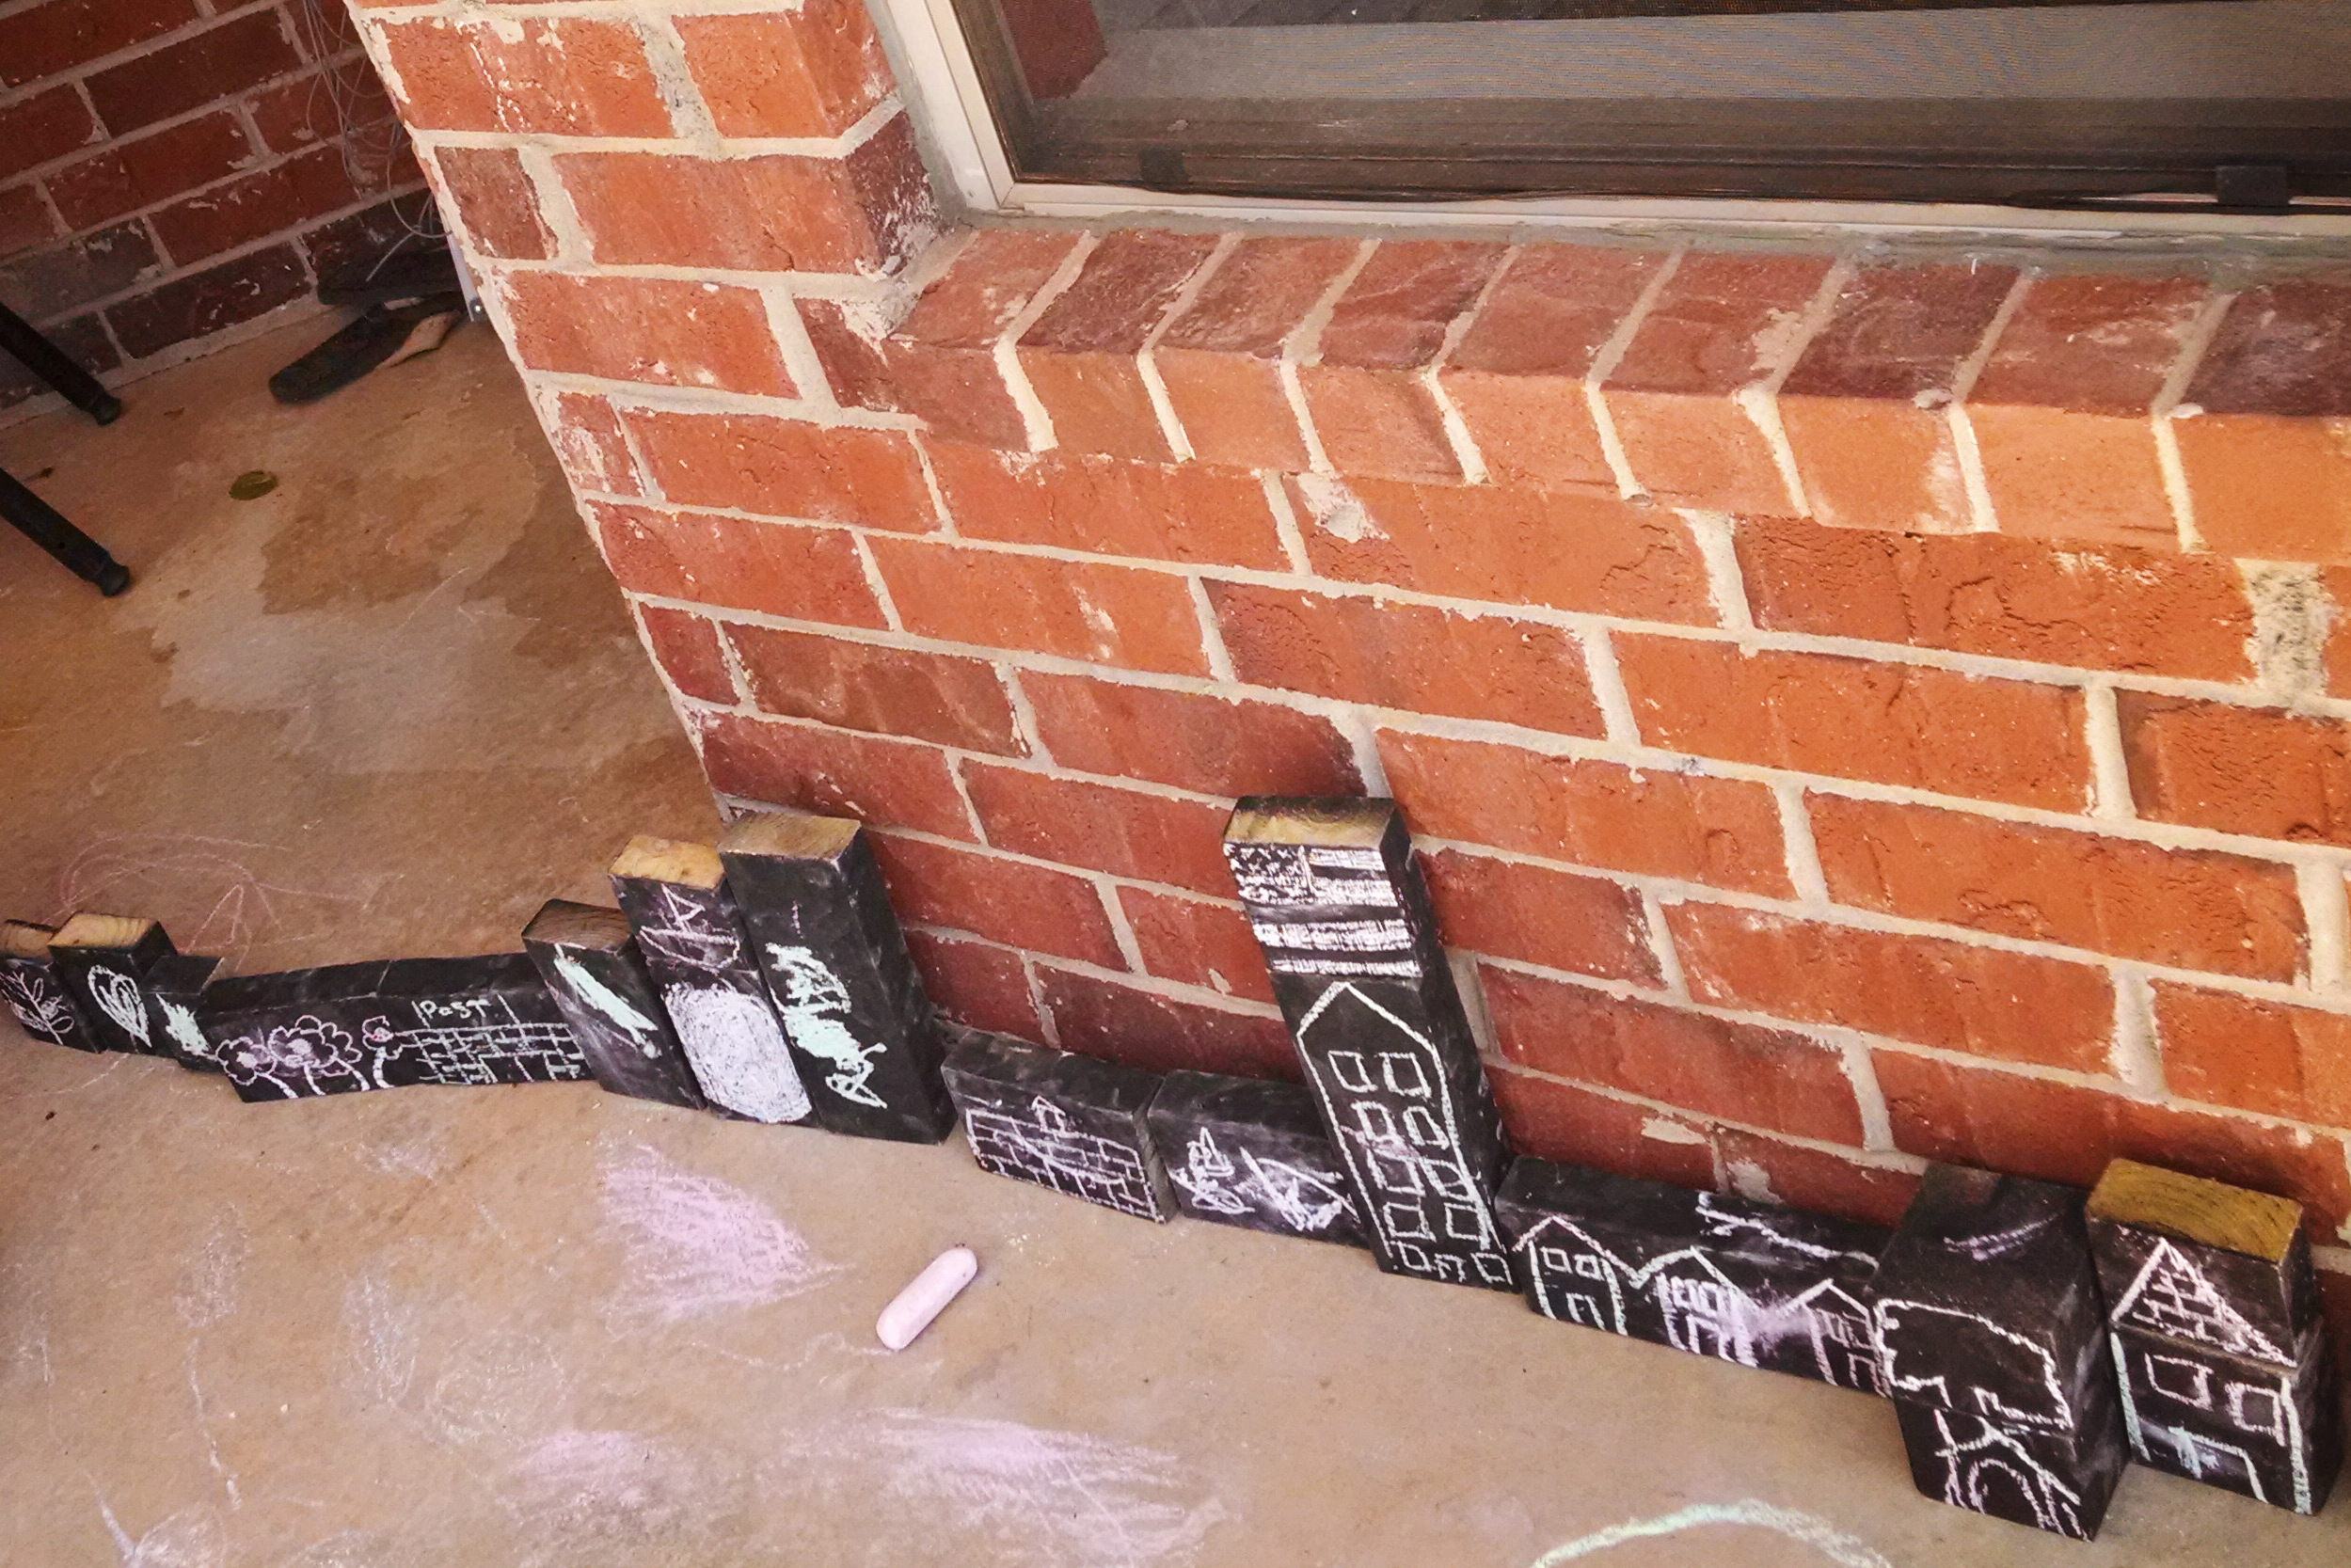
We have a great set of wooden blocks that my father-in-law made for the kids in a wood working shop. They are simple, unfinished wood, and they are dynamite! We have added our own fun shapes and varied pieces from (you guessed it!) the unfinished wood section of the craft store. However, early on we decided we wanted wooden blocks outdoors, that could stay outdoors. One day it dawned on my to just walk into our local Home Depot, grab a 2×4, and ask/pay to have it cut. What ended up happening was even better! I, by chance, ran across the scrap wood bin in the store. The 2x4s were $0.52. I grabbed what I wanted and marched over to the bench. The very kind young father running the machinery cut them for free in various shapes and sizes. These might well be our most heavily used ‘toys’….for $0.52.
They have been stacked and knocked over, used as a draw bridge for a unfinished wood castle I found at the craft store for $10:

And most recently, I sprayed them down with chalk board paint and they have become individual canvases:

Last but not least…
Painted Rocks!
Rocks and sticks have to be the best toys out there … and if there is water, dirt (and therefore mud) to mix them in, all the better. Just as we like to have an outdoor set of building blocks, we must also have an indoor set of rocks. Doesn’t everyone? Ahem. Right. So I found out that the dollar store carries wonderful bundles of smooth river rocks…since we used to live in the desert, we could not gather them as we wished from natural sources…so the dollar store it was! There are so many fun things you can do with painting rocks. Thrive 360 Living is definitely where I found myself inspired.
Here are our creations! They are the same set of rocks. Colors on one side, lines and shapes on the other.


At last, there you have it! I get to spend creative time and energy – even with the kids at times – making these things, and we all have a ton of fun playing with them.
If DIY is not your style, or if this sort of a thing overwhelms you, no worries! There is no obligation in motherhood to do such things. EVER. I just wanted to share a slice of myself. This sort of a thing gives me energy and brings life into our little circle. What gives you life? I wanna hear in the comments below!
Happy Wednesday!

These are great Mary! I can’t wait to go to Hobby Lobby (or Home Depot) and get some wood. Love the dolls, the rocks, and the blocks. Thanks for sharing!
LikeLiked by 1 person
So fun. Definitely hoping to have time for more things like this in the future. Any ideas for how to use baby formula canisters?
LikeLiked by 1 person
Yes! Cans of any kind like that make excellent drums for starters. Also, if you cut slits in the lid and get some scarves or pom poms it makes a great fine motor toy – stuffing things in and pulling them back out again. And if your kids are like mine, it’s a great alternative to the desire to get into the tissue box 🙂
LikeLike
One more thing! They are great for stacking up tall and knocking down. My son, especially, loves doing that.
LikeLike
We get a lot of life out of rocks, too! I’ve limited them to the outside and our porch due to fear of our floors getting scratched up by them. They aren’t painted, just grabbed here and there from nature and the occasional friends’ landscaping plot. (Rebecca has a real eye for finding them. It’s a phase she hasn’t grown out of, even after a year of this!) Grabbing a few smooth/polished ones for inside could be just the thing!
They bring life in another way: many of them contain fossils! 🙂 I’m trying to use this as a science teaching opportunity. We’ll see how that goes. Right now, it’s more exposure than formal teaching.
LikeLiked by 1 person
Oh! Fossils and science! I love it! I am a firm believer that rocks never get old. Our four year old had been collecting for 3 years now with no signs of loosing interest.
If you end up bringing some polished rocks inside, and pair them with Rebecca’s love for playing at the sink, I bet you might have a winning combo! Then they can be sink rocks instead of all-over-the-house rocks. Rocks rock.
LikeLiked by 1 person
Ohhh! Rocks in the sink! What a great idea. I love it when, instead of making the world our playground, as they say, we bring the world to the sink. I’m sure there’s some lessons there about aquatic engineering, or something like that.
LikeLiked by 1 person
Precisely! Go get em, mama!
LikeLiked by 1 person
We’re nearly eight years in and still collecting rocks (and sticks, and leaves, and pinecones, and…)!
I am so not a DIY girl, but my oldest kid is, and I appreciate seeing how your mind works so I can get an insight into hers!
Great ideas!
-Emily
LikeLiked by 1 person
Sounds like we have years ahead of us still! Yay! You are welcome! Have fun with it!
LikeLike
Awesome toys, Mary!!!! Thanks for the inspiration!!!
LikeLike
Thank you!!! Happy to share!!!
LikeLike
I forgot to ask: what kind of paint did you use on the rocks and people? Also how did you send the blocks? by hand? Thanks!
LikeLike
Hi Katie!
I used acrylic paint for both projects. And yes, sanded by hand – while the kids played outside, I would sit in the rocker out there with them, sand, and toss them the blocks to play with as I finished 🙂
LikeLike